
Would you like to have a quick look at the shortcode for gravity forms? For instance, how many parameters does it take? Which parameters are required and which parameters are optional? A gravity forms shortcode is a little piece of code that can be inserted into a WordPress page or post editor to render the gravity forms.
We all know that gravity forms is a great plugin to build professional and efficient forms quickly and easily for your website. If you are in need to build a simple contact form or a complex user registration form, gravity forms can always assist you in all these cases. This is an awesome plugin with so many features integrated. The true power is, gravity forms is highly customizable. They have rich documentation with all the action hooks and filters. And you can use them based on your need.
By default, gravity forms has standard “Add Form” functions contained within the page editor. So you may not need to write this shortcode manually inside your post or page. But in case you are interested and you need to know what is the exact format of this shortcode and how many parameters does it takes, then this post describes and explains those for you.
How does a shortcode for gravity forms look like?
It follows the general WordPress shortcode format starting with a opening 3rd bracket and ending with a closing 3rd bracket. The simplest form of the shortcode is:
[gravityform id="1" title="false" description="false" ajax="true"]
And the longest form of this shortcode will look like below:
[gravityform id="1" title="false" description="false" ajax="true" tabindex="21" field_values="name=John Doe&email=john@example.com"]
In the longest format, you can see, it takes 6 parameters. Only one of these parameters is required and the rest are optional.
Detailed explanation for all the 6 parameters for gravity forms shortcode.
So what are these 6 parameters are? Let’s have a look below:
- id – (required)
The id of the form to be embedded (required). You can get the form id easily by visiting the Dashboad -> Forms. In the below screenshot, you will see that we have two forms here with ID 1 and 2.
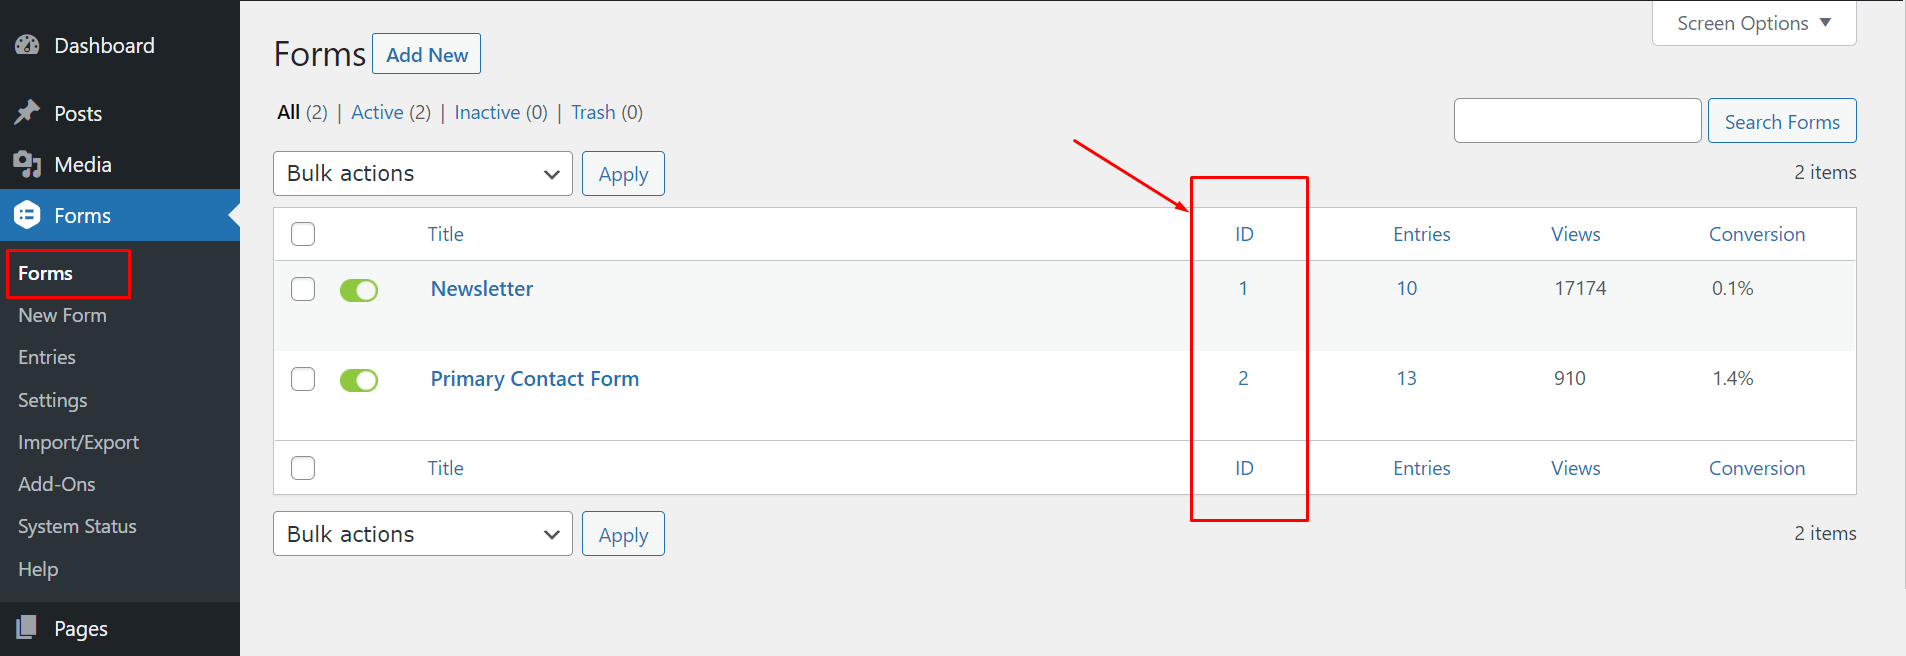
- title – (optional)
The title is the name of your form (optional). In the above screenshot, we have two forms with titles “Newsletter” and “Primary Contact Form”. You can set the value of the title as true or false based on your requirements. The default value is “true”. If you set the value as false, the form title will not be displayed in the frontend. - description – (optional)
Whether or not to display the form description. Defaults to ‘true’. (optional). If you visit to a specific form settings page, you will find the description field there. Here is a sample screenshot

- ajax – (optional)
Specify whether or not to use AJAX to submit the form. The default value is “false”. This is also an optional parameter. - tabindex – (optional)
Specify the starting tab index for the fields of this form (optional parameter). - field_values – (optional)
Specify the default field values. This is also an optional parameter. You can use this parmeter to auto populate your form fields.
A little bit of explanation of field values parameter
To consider an example, you have a simple form with Name, Email and Phone Number fields. If you want to auto-populate the “Name” and “Email” fields whenever a user visits your page, you first need to allow those fields to be auto-populated dynamically from the field settings in your form editor. You can do this by clicking on a form field, after that, go to the advanced setting for that specific field and enable the checkbox “Allow field to be populated dynamically”. And finally, set a parameter name for that specific field. This parameter name is an identifier to that specific field. Below is a screenshot for your reference.

In the above example, we have enabled the “Name” field to be auto populated and set the parameter name as “name”. After that, we used the shortcode parameter “field_values” as field_values="name=John Doe".
In case you want to auto populate multiple fields, you can just follow the same process for each of those fields and allow those fields to be auto populated dynamically by setting a unique parameter name for those fields. In the above example, we have enabled “Name” and “Email” address to be autopopulated and after that, we set the field_values value as field_values="name=John Doe&email=john@example.com"
How to insert shortcode for gravity forms in your page?
Shortcode for gravity forms can be placed on your page or posts using several ways. Therefore, We are going to discuss the three most common usage scenario below.
- Using gutenberg block editor (WP5+ block editor)
- Using classic editor
- PHP code snippets
1. Use a Gutenberg Block Editor to insert the shortcode
If you are using the Gutenberg block editor to edit your page, you can insert gravity forms shortcode into your page using the Shortcode block (under the Widgets category). Below is a step by step guide:
- Note the form ID that you want to use in your page.
- Open your page using the gutenberg block editor.
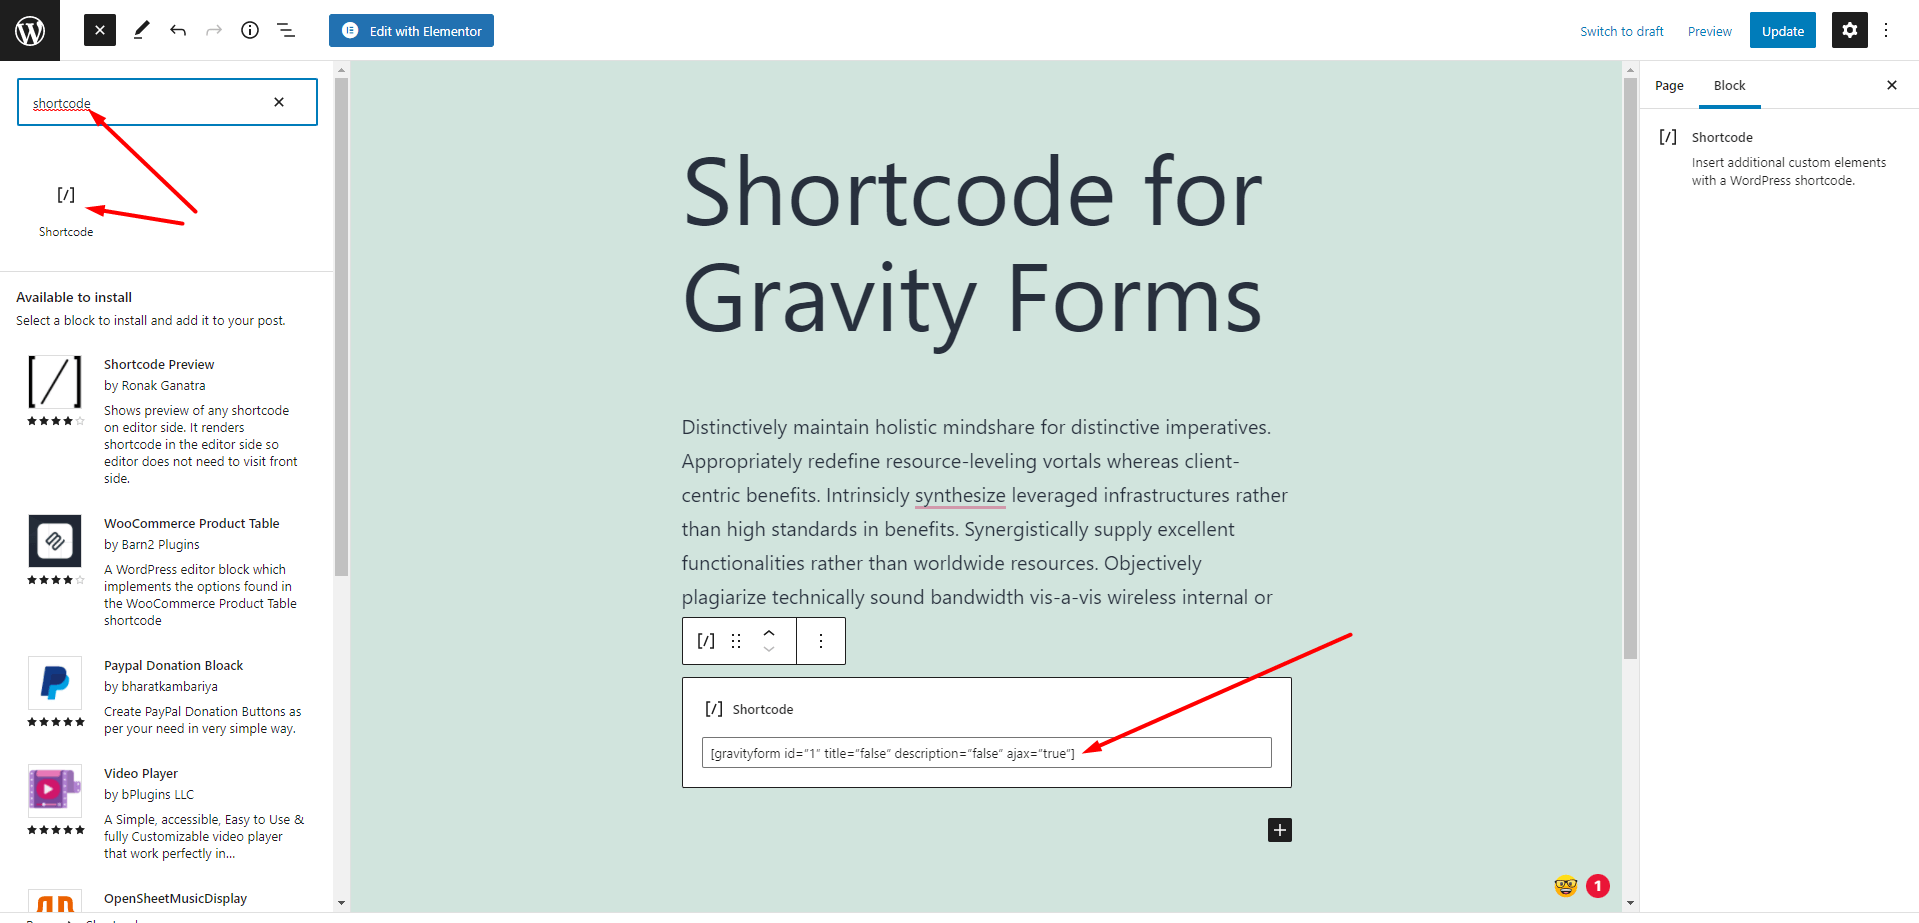
- Open the “Add New Block” dialog or click on the “plus” icon (+) and write shortcode in the search bar to search the “shortcode block widget”
- Add this shortcode block widget to your page. You can drag and drop to change the widget location in your page.
- Write down the gravity forms shortcode in this shortcode widget and finally save your page.
Please have a look at this sample screenshot.
2. Use Classic Editor to insert the shortcode
Gravity Forms provide an easy solution to insert the shortcode into your page when you use the classic editor to edit your page. Let’s consider a simillar step by step guide below.
- Open the page using classic editor where you want to use gravity forms.
- Position your cursor inside your page where you want to place the gravity forms shortcode
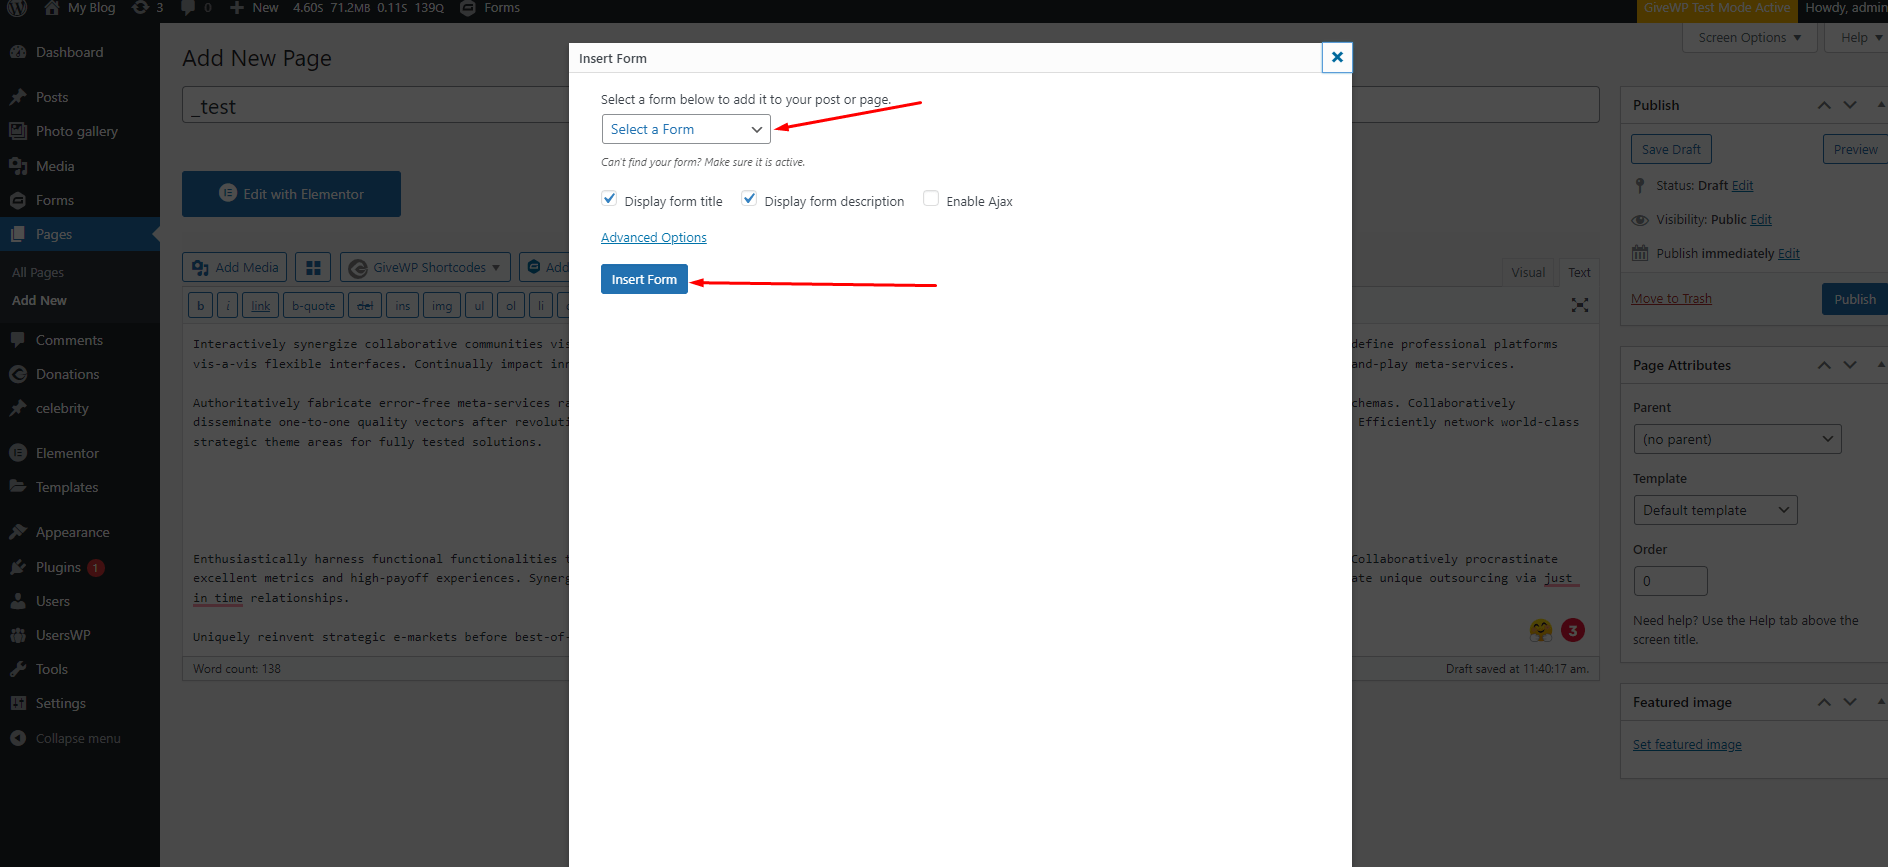
- Click on the “Add Form” button that is located just above the page editor. Please see the screenshots below.
- Select the form from the dropdown and set the title, description and ajax behaviour as you need.
- Click on “Insert Form” button and finally save your page.

3. Use PHP code snippet to insert the shortcode into your page or post template
In addition, if you want to use gravity forms shortcode inside your page templates, open the template in your favorite text editor. And use the below sample code to insert the shortcode for gravity forms. Replace the form ID, title, description, and ajax as you need.
// Insert gravity forms shortcode in your php file
<?php echo do_shortcode('[gravityform id="1" title="false" description="false" ajax="false"]'); ?>
That’s all. Hope you found this tutorial to be helpful and informative. If you have any questions, please let us know through the comments section below. We would love to hear your voice.
Additional Tips: Gravity Forms Ajax Spinner: How to Change It
In conclusion, if you would like to read some more tips and tricks about WordPress or WooCommerce, please visit our blog page from here.
Thank you.